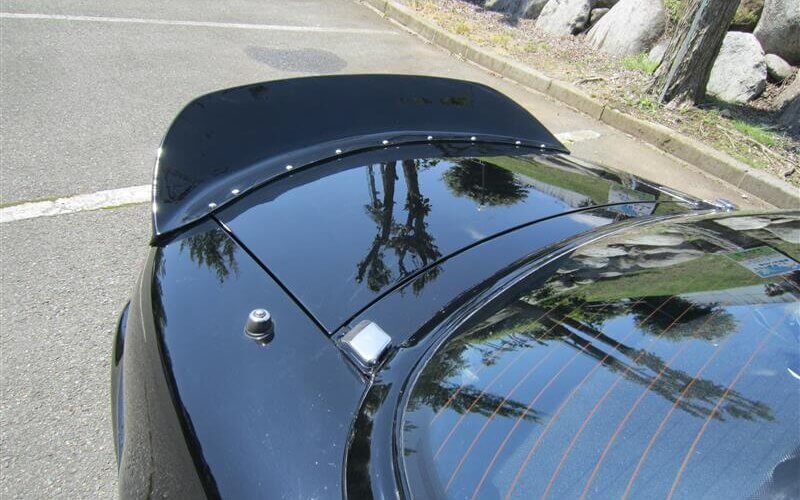
The ducktail is now polished and installed. The set screws will be changed to black painted ones at a later date.I am satisfied with the way the body line is connected with the body. External products tend to be three-part ones, but I didn’t want to do that, so I fitted them in this way. It looks like this from the rear.You may not recognize the type of car for a moment. I think it matches the front protrusion.I know everyone has their own taste, but I didn’t like the round shape of the stock NA. I didn’t like any of the aero parts sold in the market, so I made all of them by myself, and I ended up with a style that I like very much.I like this kind of sharp silhouette. Ducktail Spoiler for Mazda Miata MX-5 NA 1989-1997 Roadster Rear Trunk Duckbillhttps://ebay.us/xZQOoK
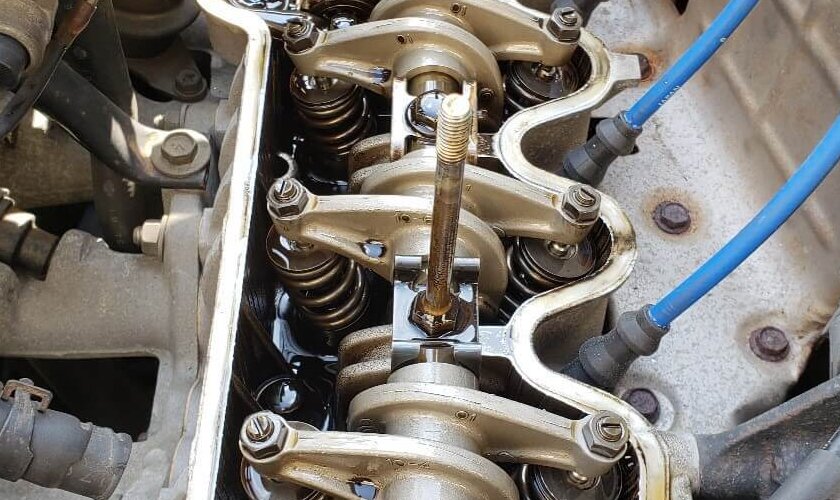
It is time to adjust the tappets as the weather is about to get warmer. Remove the two 10 mm bolts in the red circle. I should have taken more pictures, but there is also a throttle wire stay bolt in the front, so remove that as well (10mm x 1). Remove the two hoses that are stuck in the head cover. and the connector of the throttle valve switch. The connector can be pulled out by removing the U-shaped metal clip with a precision screwdriver. First, loosen the rubber hose band on the turbine side of the intake pipe. Loosen the hose band of the rubber hose on the turbine side, and push it into the throttle side as shown by the red arrow. and push it into the throttle side. Next, loosen the hose band of the rubber hose on the throttle side. Then, turn the hose band of the throttle side rubber hose about 90 degrees as shown by the red arrow. The intake pipe can be pulled out. Then, remove the two 14mm nuts on the head cover. The head cover will come off. Since the adjusting bolt had a pitch of 1mm. If you turn […]
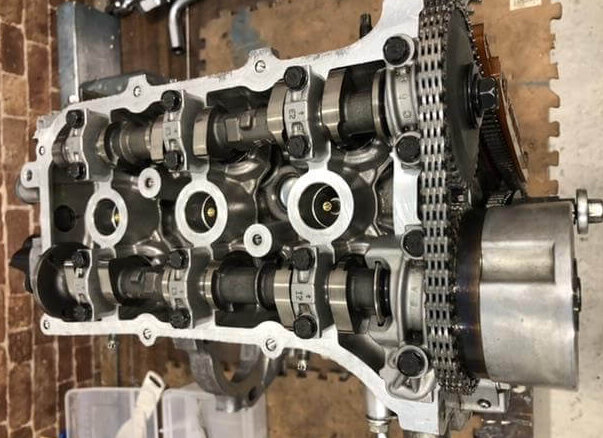
First, I drained the coolant, engine oil, and transmission oil, removed the bolts from under the sway bar and strut, shook the angle of the hub to pull out the drive shaft, and pried the drive shaft off the transmission side with a crowbar. I removed the front side of the muffler, disconnected the battery, disconnected the water hoses, disconnected the harness couplers, removed the intercooler, intake hoses, intake manifold, removed the turbine with the exhaust manifold (leaving the oil lines attached to the turbine), removed the lower center engine mount, put the engine on a dolly and removed the left and right engine mounts. The engine was then placed on a dolly, the mounts were removed from both sides, and the vehicle was lifted up and the engine and transmission were lowered. I left the compressor, condenser, radiator, etc. in the car. I removed the alternator because it hits the member when I unload it. I couldn’t lift it, so I slid the dolly and workbench up to the same height. The head cover is open. There is nothing wrong with it. Removing the oil pan, I came face to face with the crank. No damage was found. There […]
As a collection of tens of thousands of parts, a car is constantly exposed to movement and vibration during use, and it is sometimes said that it needs to be “break in. Many people have heard of “engine break-in”, where the engine is run at a low RPM for a while, but it is a little known fact that there is a similar break-in process for suspensions as well. In this article, we will discuss “breaking in the suspension”. Is it necessary to break-in the suspension? There are pros and cons regarding the need for suspension break-in. However, as it turns out, the suspension needs to be broken in. The suspensions of mass-produced cars are subject to a small amount of error. Therefore, even if the suspension is 100% complete, some amount of driving is necessary before the matching is completed in the assembled state. Therefore, it is necessary to break-in the suspension. In particular, it is a good idea to break in the suspension when you have replaced the stock suspension with an external suspension or dampers. Break-in of the factory installed suspension Some people believe that the factory-installed stock suspension does not need breaking-in, but the stock suspension […]
Figaro has a hose to drain the water that has flowed into the gap between the trunk hangar and the hood. Most of the cases of this hose have not been replaced for 30 years. I think you should replace it immediately. If the drain water does not come out easily, it is highly possible that the hose is clogged. If it is not replaced, it has deteriorated like the state of the attached image. This hose is on the left and right, looking into the trunk. Looking at the removed hose, it was so clogged. Drain water does not flow. That’s why I will replace it. Prepare a hose with an inner diameter of 10 mm and a hose of about 2 m 20 cm. It is a silicon hose. The hose is fairly stiff, but pull it out while twisting it. There are two hoses, so pull out both. After pulling out both, pull up and pull out the lower side as well. After pulling it out, cut the purchased hose according to the length of the existing hose and replace it. When you have finished replacing it, put it back. It has a hose glamp, but it […]
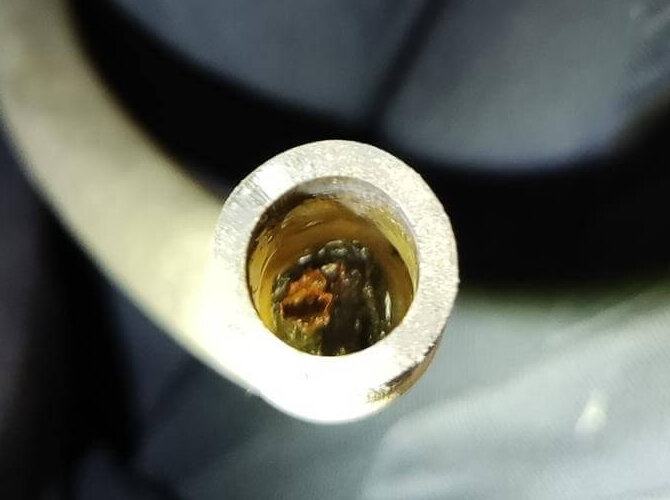
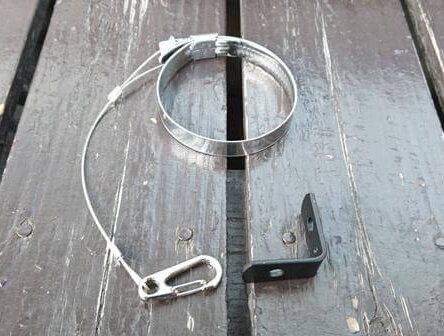
It seems that the oil filter (element) of S2000 is often loosened. I haven’t loosened it until now, but since I’m doing Gymkhana, I decided to make it as insurance. Regarding the hose band, the specifications are different, 64Φ when using an element made by an outside company and 79Φ when using a genuine element. Prepare a hose band that matches the element to be used. The material is made of stainless steel. I chose stainless steel wire (1Φ) as the wire. This also serves as a rust preventive measure. The L-shaped angle is fastened together with the spool valve. Since the bolt is 6 mm, prepare an angle that matches it. There is no problem even if you do not attach the spring snap. I just thought it would be easier to make it removable during maintenance. At first, I was planning to use the commercially available angle as it is, but I felt awkward, so I bought a suitable hardware again and bent it. Tighten the angle together with the spool valve. After connecting to the angle with a spring snap, fix the oil filter and you’re done. I don’t think it is necessary to stretch the wire […]
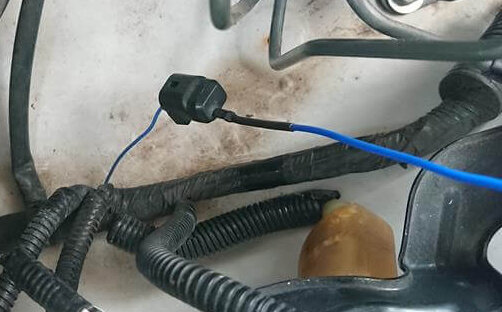
It is necessary to acquire the revolution signal when installing a tachometer, etc., but we will introduce a method to acquire it without cutting the ECU wiring. According to the Defi connection guide, the TA signal can be taken out from the “engine revolution detection coupler”. This time it is AP2 type. So, this is the S2000 engine revolution detection coupler. Describes where the coupler is located. Looking at the lower right (fender side) of the brake master, the vehicle harness passes from the bulkhead. There is a coupler with only one blue line coming out of it. It’s hard to find because it’s covered with a rubber cap and fixed to the harness with vinyl tape, but you’ll find it if you look closely. It is located between the master back and the ABS unit. The good thing about the engine revolution detection coupler is that it is not used at all because it is for maintenance, and even if the wire breaks for some reason, nothing is connected, so there is no problem with running. For connection, it is easy to insert it directly into the coupler and extend it. If you use the male terminal of the […]
There is nothing wrong with the tail lens, but in consideration of the model year, the gasket was replaced before the lens was flooded. I forgot to take a picture, but the part numbers of the gaskets are as follows. Please note that the product numbers are different on the left and right.Right: 33502-S2A-A11Left: 33552-S2A-A11 Part of the interior of the trunk will be removed. It is not necessary to remove all of them, just remove them by turning over only the area around the tail lens. The lens is fixed with 4 nuts. Work is easier with a 10mm deep socket. Be careful not to forget to remove the couplers. The nut at the back has a clip to fix the wiring, so remove it by interior remover. It is very dirty when the lens body is removed. While replacing the gasket, also clean it. The car body side is also quite dirty. Mud stains can cause rust, so it’s best to keep them as clean as possible. Install a new gasket. The side with double-sided tape is the lens side. It will recover in the reverse order. Actually, I didn’t know the tightening torque of this nut, so […]
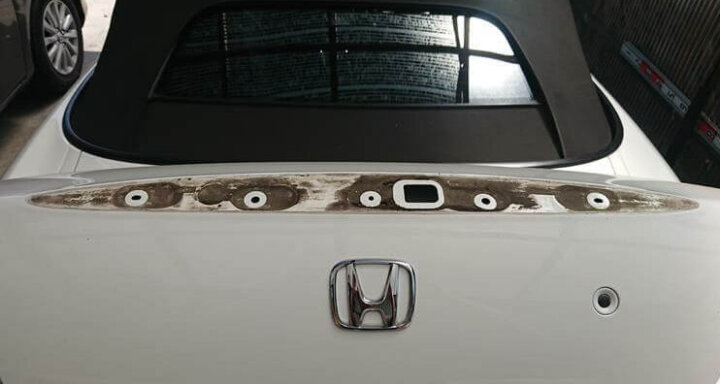
When the body color of S2000 is white, the water stains on the parts that are not normally removed are conspicuous. After maintaining the area around the tail lens, I worked around the high mount stop lamp. The high mount stop lamp is fixed with 5 nuts. Like the tail lens, it uses a 10mm deep socket. Since the tightening torque was unknown here as well, I measured it with a torque wrench, but it seems that this is also 10 Nm. Only the nut in the center does not allow tools to enter, so I removed the actuator attached to the trunk striker and then accessed it. The actuator has been fixed with two screws. This is a terrible stain. The mud stains are also terrible, so I had a hard time cleaning it. The scale is also stubborn, so I used the compound carefully. After cleaning. It became like this. The high mount stop lamp side was also quite dirty. Since the gasket could not be separated, I cleaned it with a rag. I’m a little worried if it will leak if reused. I was able to clean this much. Return in reverse order. Be careful not to […]
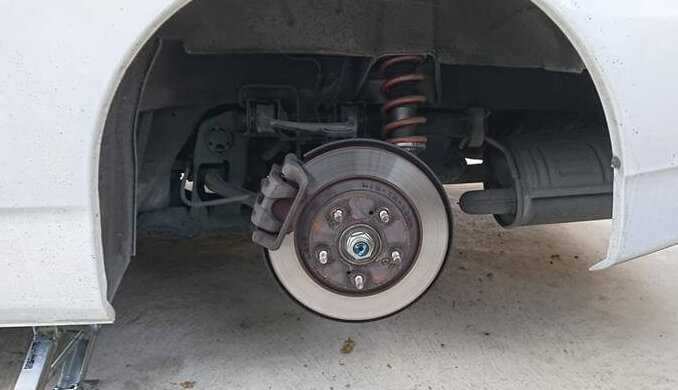
I sometimes hear that the side parking does not work for Honda cars, not just the S2000. If you feel that adjusting the wire tension by adjusting the parking brakes does not improve at all, try this method. Surprisingly, this often improves. Be sure to chock the wheels before starting, as the parking brakes will remain released for some time. Remove the shift knob and remove the center panel. There are hazards and roof switches so don’t forget to remove the coupler. The wire can be found by looking through the hole containing the “yellow cord” in the photo. Leave the parking lever as it is and loosen the wire as much as possible. In this state, pulling the lever will not work at all, so make sure that the car does not move. The photo is in a fully loosened state. Then jack up, remove the rear tires, and remove the calipers. The caliper bolts may be stuck, so it will be easier in the future if you treat them with anti-seizure agent when you remove them. After removing the caliper, fully return the piston. The fluid will return to the master, so make sure it doesn’t overflow. The […]