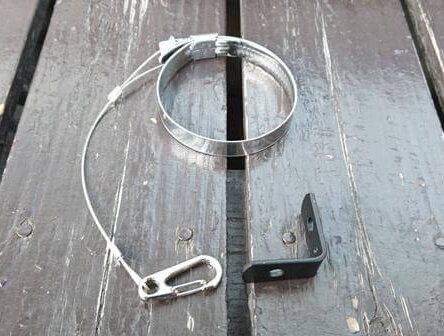
It seems that the oil filter (element) of S2000 is often loosened. I haven’t loosened it until now, but since I’m doing Gymkhana, I decided to make it as insurance. Regarding the hose band, the specifications are different, 64Φ when using an element made by an outside company and 79Φ when using a genuine element. Prepare a hose band that matches the element to be used. The material is made of stainless steel. I chose stainless steel wire (1Φ) as the wire. This also serves as a rust preventive measure. The L-shaped angle is fastened together with the spool valve. Since the bolt is 6 mm, prepare an angle that matches it. There is no problem even if you do not attach the spring snap. I just thought it would be easier to make it removable during maintenance. At first, I was planning to use the commercially available angle as it is, but I felt awkward, so I bought a suitable hardware again and bent it. Tighten the angle together with the spool valve. After connecting to the angle with a spring snap, fix the oil filter and you’re done. I don’t think it is necessary to stretch the wire […]
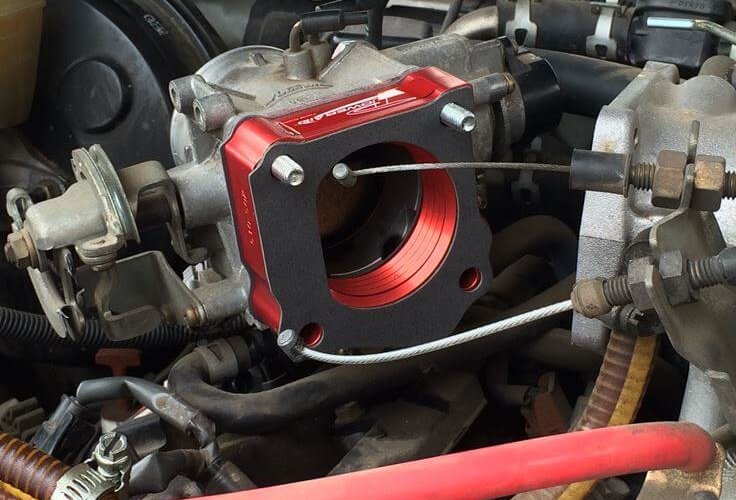
Since the throttle spacer for 5VZ-FE is not sold in Japan, I personally imported the one made by AIRAID from overseas. The contents are as follows.・Spacer body・2 gaskets・Mounting bolts・Promotional stickers・Instructions (not shown in the photo) The work is easy. Remove the throttle from the engine side. Of course, the throttle cannot be removed unless the air intake is removed. Don’t forget the various wires. Install the throttle spacer on the removed throttle side. Don’t forget to install the attached gasket at this time. Then put it back. Since the wire will be pulled by the amount of the spacer, actually step on the accelerator to adjust the play. I think this is all right. Completed by restoring the removed air intake. When I ran after installing it, the response improved dramatically! Since the amount of depression of the accelerator has decreased, fuel efficiency has also improved. I think that it is a part that can be installed without any loss.
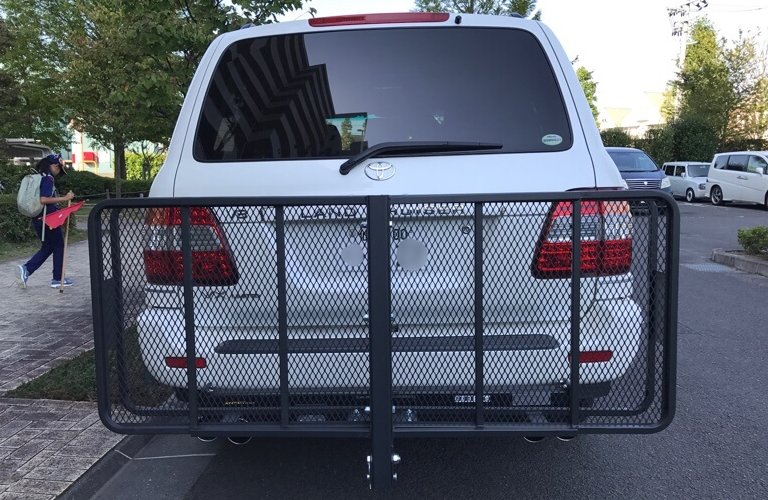
Assemble and Install CURT 18153 Basket-Style Cargo Carrier to TOYOTA Land Cruiser J100. Attached hitch member is SUNTREX Tag Master Standard, 5.0cm for receiver. The hitch cargo’s adapter is for US standard 2inch / 5.08cm, so it seemed that it needs to be scraped a little, but it was installed without any processing. A little tight but everything is OK. Let’s assemble. You should prepare 17/19/24mm wrench and monkey wrench. There is a little gap in the joint. If it wobbles, you’ll need a spacer. When installing, it is better to fold the hitch cargo like this so that it can be inserted smoothly into the hitch member. Installation is complete. The reflector is a little poor. External reflector may be good. You can fold it when you’re not using it, but it’s longer because of the clearance. But it’s convenient because you can open the back door even when folded. However, since you can’t see it side mirror or rear-view mirror at all, be careful not to hit it when parking. So recommend using rear-view camera. Have fun!