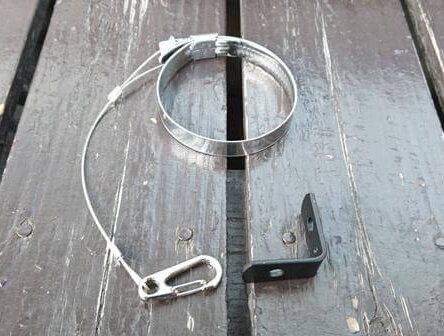
It seems that the oil filter (element) of S2000 is often loosened. I haven’t loosened it until now, but since I’m doing Gymkhana, I decided to make it as insurance. Regarding the hose band, the specifications are different, 64Φ when using an element made by an outside company and 79Φ when using a genuine element. Prepare a hose band that matches the element to be used. The material is made of stainless steel. I chose stainless steel wire (1Φ) as the wire. This also serves as a rust preventive measure. The L-shaped angle is fastened together with the spool valve. Since the bolt is 6 mm, prepare an angle that matches it. There is no problem even if you do not attach the spring snap. I just thought it would be easier to make it removable during maintenance. At first, I was planning to use the commercially available angle as it is, but I felt awkward, so I bought a suitable hardware again and bent it. Tighten the angle together with the spool valve. After connecting to the angle with a spring snap, fix the oil filter and you’re done. I don’t think it is necessary to stretch the wire […]
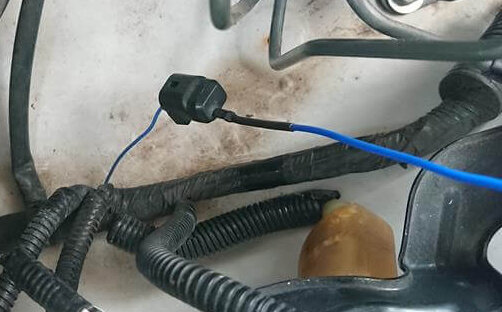
It is necessary to acquire the revolution signal when installing a tachometer, etc., but we will introduce a method to acquire it without cutting the ECU wiring. According to the Defi connection guide, the TA signal can be taken out from the “engine revolution detection coupler”. This time it is AP2 type. So, this is the S2000 engine revolution detection coupler. Describes where the coupler is located. Looking at the lower right (fender side) of the brake master, the vehicle harness passes from the bulkhead. There is a coupler with only one blue line coming out of it. It’s hard to find because it’s covered with a rubber cap and fixed to the harness with vinyl tape, but you’ll find it if you look closely. It is located between the master back and the ABS unit. The good thing about the engine revolution detection coupler is that it is not used at all because it is for maintenance, and even if the wire breaks for some reason, nothing is connected, so there is no problem with running. For connection, it is easy to insert it directly into the coupler and extend it. If you use the male terminal of the […]
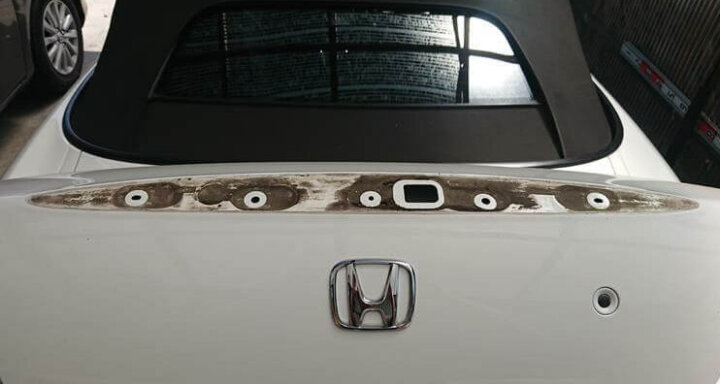
There is nothing wrong with the tail lens, but in consideration of the model year, the gasket was replaced before the lens was flooded. I forgot to take a picture, but the part numbers of the gaskets are as follows. Please note that the product numbers are different on the left and right.Right: 33502-S2A-A11Left: 33552-S2A-A11 Part of the interior of the trunk will be removed. It is not necessary to remove all of them, just remove them by turning over only the area around the tail lens. The lens is fixed with 4 nuts. Work is easier with a 10mm deep socket. Be careful not to forget to remove the couplers. The nut at the back has a clip to fix the wiring, so remove it by interior remover. It is very dirty when the lens body is removed. While replacing the gasket, also clean it. The car body side is also quite dirty. Mud stains can cause rust, so it’s best to keep them as clean as possible. Install a new gasket. The side with double-sided tape is the lens side. It will recover in the reverse order. Actually, I didn’t know the tightening torque of this nut, so […]
When the body color of S2000 is white, the water stains on the parts that are not normally removed are conspicuous. After maintaining the area around the tail lens, I worked around the high mount stop lamp. The high mount stop lamp is fixed with 5 nuts. Like the tail lens, it uses a 10mm deep socket. Since the tightening torque was unknown here as well, I measured it with a torque wrench, but it seems that this is also 10 Nm. Only the nut in the center does not allow tools to enter, so I removed the actuator attached to the trunk striker and then accessed it. The actuator has been fixed with two screws. This is a terrible stain. The mud stains are also terrible, so I had a hard time cleaning it. The scale is also stubborn, so I used the compound carefully. After cleaning. It became like this. The high mount stop lamp side was also quite dirty. Since the gasket could not be separated, I cleaned it with a rag. I’m a little worried if it will leak if reused. I was able to clean this much. Return in reverse order. Be careful not to […]
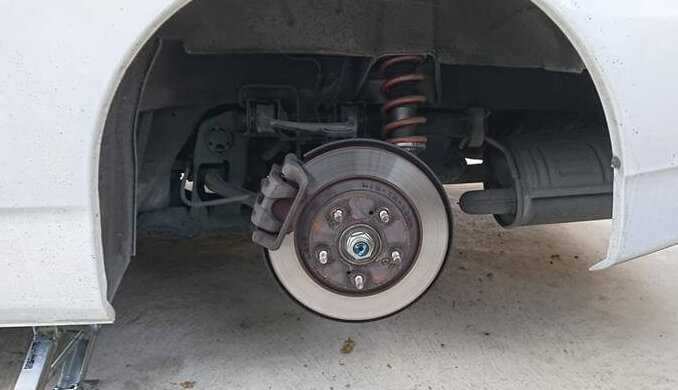
I sometimes hear that the side parking does not work for Honda cars, not just the S2000. If you feel that adjusting the wire tension by adjusting the parking brakes does not improve at all, try this method. Surprisingly, this often improves. Be sure to chock the wheels before starting, as the parking brakes will remain released for some time. Remove the shift knob and remove the center panel. There are hazards and roof switches so don’t forget to remove the coupler. The wire can be found by looking through the hole containing the “yellow cord” in the photo. Leave the parking lever as it is and loosen the wire as much as possible. In this state, pulling the lever will not work at all, so make sure that the car does not move. The photo is in a fully loosened state. Then jack up, remove the rear tires, and remove the calipers. The caliper bolts may be stuck, so it will be easier in the future if you treat them with anti-seizure agent when you remove them. After removing the caliper, fully return the piston. The fluid will return to the master, so make sure it doesn’t overflow. The […]
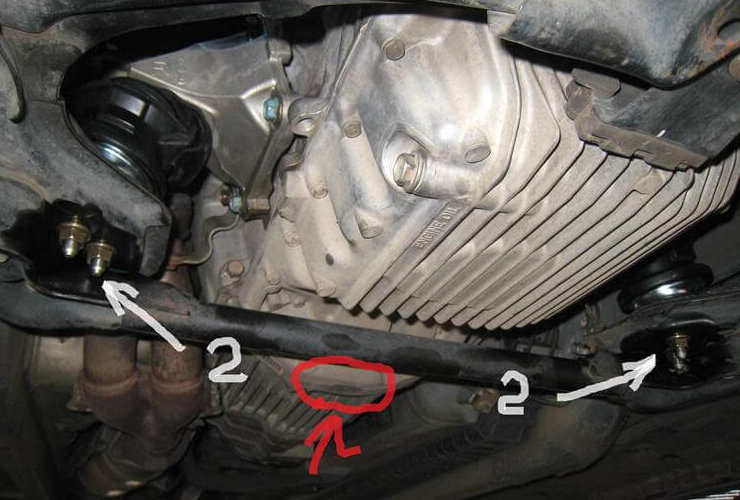
Replacing the engine mount is a little difficult. Anyone with motivation and patience can do it. The tools are a box wrench and a socket wrench. The smaller the socket, the better. Rigid racks and garage jacks are a must. The rest is a genuine scissors jack. Perform normal jack up. Raise it enough for people to enter. Next, remove the two nuts on the underside of the mount. There are a total of 4 on both the left and right. Then use a scissors jack to raise the engine at the joint between the engine and the mission. It is around the red circle. Raise the engine until the screw heads in this photo come out a little. If you have an engine damper, don’t forget to remove it before raising the engine! In addition, it may be better to remove the intake of the aftermarket product for safety. Remove the four bolts on the driver’s side and engine side shown in this photo. I think that you can take a lot of space by lowering the coupler of the air conditioner cord from the air conditioner compressor and removing it, and by removing the ground wire from the […]
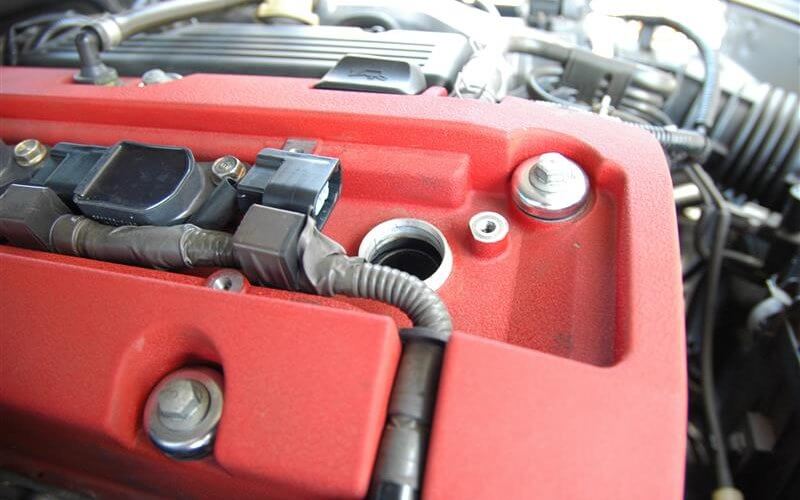
Recently, the check engine lamp flashed several times while driving S2000. The auto dealer’s mechanic confirmed that the engine was misfiring. The cause of the misfire has not been identified, but decided to replace the spark plug and ignition coil to eliminate the possible causes. First, remove the plug cover and remove the ignition coil and plug in this order. Check the removed spark plug. The condition of the plug is better than I expected. However, the gap was about 1.3mm compared to the new 1.1mm. It was almost limit value. Comparison of old and new plugs. An old one is the NGK Iridium MAX. It is a long-life plug, but it seems that it has reached the end of life at 30,000 km. A new one is DENSO iridium power. The new plug is not a long-life type, so I think that I have to replace it within 10,000 km. This is a new ignition coil. The genuine product is expensive, so I choose compatible product. Made by HITACHI. For F20C, you should choice “U14H01-COIL”. Comparison of old and new ignition coils. The genuine ignition coil is made by Denso. The plug entry is brown and dirty. Install the […]