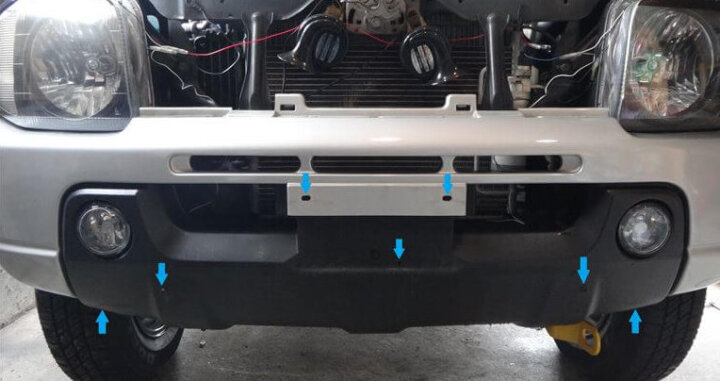
The red arrow in the photo is the clip position, and the blue arrow is the bolt position. First, open the hood and remove the front grill. There are only three black clips at the arrow on the photo, so pull it out and remove the grill. The photo is already after removing the grill. When you remove the grill, there are three black clips on the upper part of the bumper below it (the part indicated by the arrow below), so remove it. Remove the number and under garnish attached with the bolt or bolt nut at the position of the blue arrow. For the under garnish, if you do not remove it, you will not be able to see the bolt that holds the bumper at the bottom, so you will not be able to turn the bolt. I don’t think this work is necessary unless the car is equipped with an under garnish. The photo is after removing the number and under garnish. Remove the 3 bolts on the underside of the bumper and the 2 black clips on the outside. Remove the three black clips that secure the fender liner (black resin plate on the circumference […]
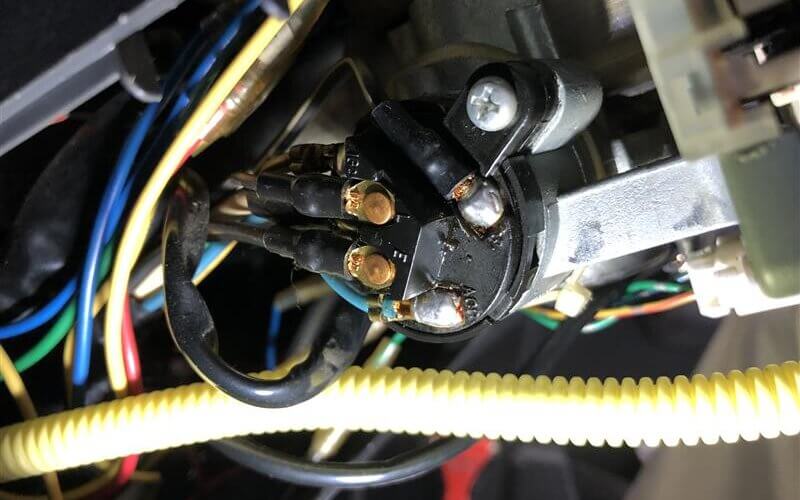
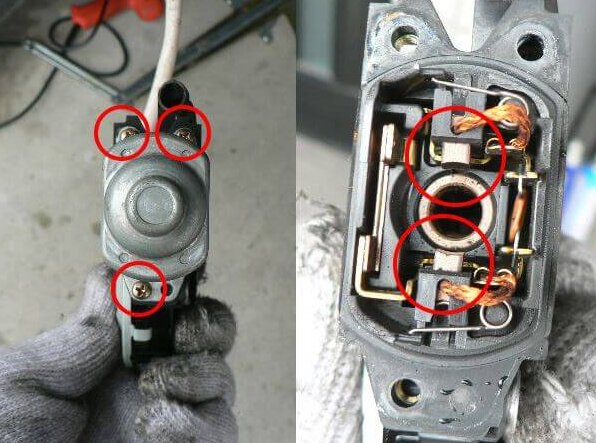
After starting the engine, the following phenomena have come to occur. (1) The power window switch makes a strange noise and does not move.(2) Rear defogger does not work.(3) The blower fan does not work. I checked the wiring and fuses, but the conclusion was that the key position did not return exactly from the start to the ON position. After starting the engine, I returned it a few millimeters and all the functions worked in the normal position. Replace the ignition switch. It is fastened with one screw. Remove the coupler near the steering shaft. Unlike the late model, it cannot be separated. Assembling with a key cylinder costs about $ 150. Disassembling is also troublesome. Cut the wiring that connects to the key cylinder. Replace from 270,000 km of type 1 to 90,000 km of type 2. Reconnect with a bullet terminal. I installed it in the reverse procedure and the problem was solved. For reference, the late model comes with a coupler so it can be easily replaced. Vehicles over 200,000 kilometers need to be replaced. This switch is also separated by a coupler, but for some reason we do not sell switch-only parts, and unnecessary harnesses […]
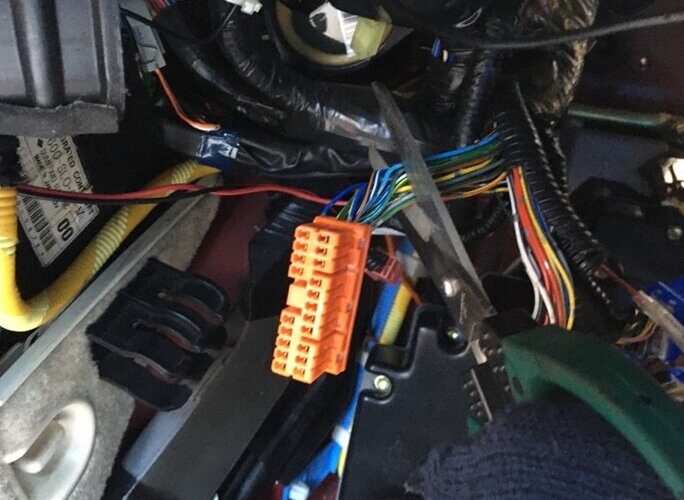
Recently, the power window of JB23 Jimny is not working well. It vibrates jerky at the start and stop. Motor life? I will disassemble it for the time being. As a preparation, tape the door handle. Remove the parts marked with a circle. When I remove the panel, I pull out the coupler of the switch, but I can’t pull it out even if I push it with my finger. Push it with a flat-blade screwdriver and it will come off quickly. The driver’s side was pushed with a finger and slipped out. After removing the panel, switch it on again and lower the glass. Remove the bolt indicated by the circle that holds the glass, and raise the glass to the top. Tape the glass and push the switch down to lower the frame. The yellow circle is the switch. Remove the blue circle coupler to the motor, but you can push it by hand. The X frame will not come out unless you remove the clip from the sheet metal after pulling it out. Remove the four red circle bolts on the right, and remove the two red circle bolts on the left while supporting with your hand. […]
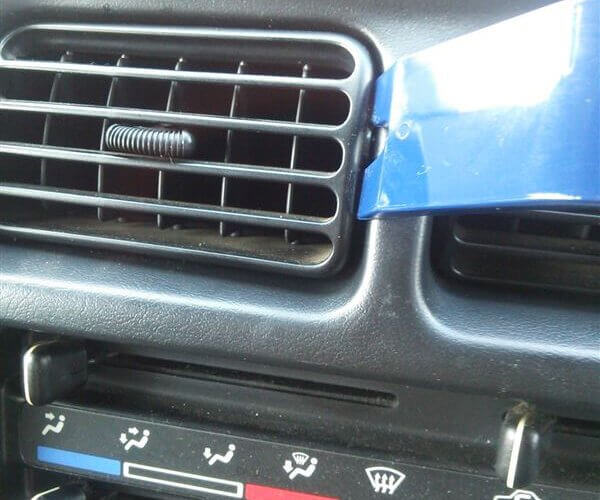
In the summer, JB23 Jimny’s air conditioner louver becomes loose and turns upward, but I adjusted it. Since the plastic is hardened, insert the interior peeler on the right side of each louver and carefully remove it. There is a small part on the left side of the louver, which seems to adjust the looseness. A tension is applied by putting an M2.6 washer in the hole where the small part was fitted. The washer fits snugly. Fit the notch of the small part on the front side. Carefully fit the louver from the left side and you’re done. It looks like it was completed without any discomfort.
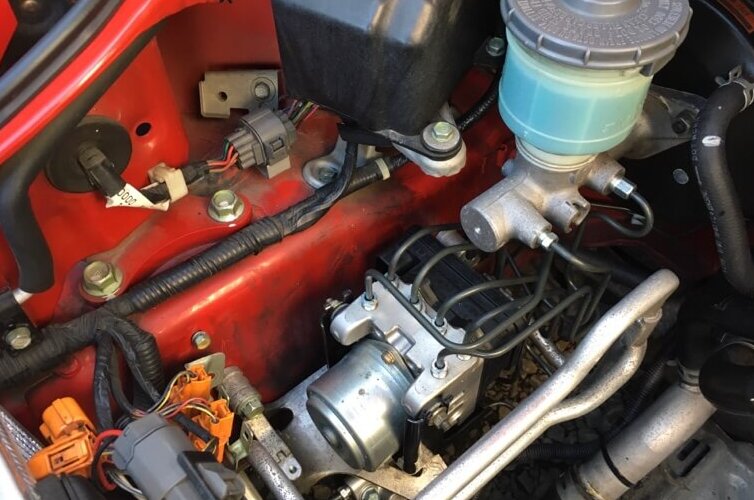
This article is a continuation of the article on replacing ABS Part 1 (Unit Edition). For this ABS replacement, the modulators of other models were diverted. Harness kits are sold by various shops if it is a modulator for the latter model of NSX, and I think that there is almost no trouble with coupler on, but of course this can not be used as it is because the wiring is different. Harness kits are also quite expensive, and considering the time and effort of using them to replace wiring, I decided to make all of them. Therefore, one point is that when you buy a second-hand modulator of another model, you should buy not only the main body but also the one with the wiring cut in the middle as shown in this image. If it is only the main body, it will be necessary to obtain a coupler separately, and the hurdle will rise at once. If it’s just the main body, it’s rolling at a price like free. Access the ALB control unit by removing the glove box, air conditioning duct, and floor panel on the passenger side. I will remove this because it is no longer […]
This article is a continuation of the article on removing ALB (Anti-Lock Brake). We have prepared in advance the genuine parts required for ABS replacement. Other than those that can be diverted from ALB, mainly brake piping, modulator brackets, proportioning valves, bolts, etc. First of all, I assembled around the modulator using the bracket etc. removed from ALB. I polished the things to be reused and got rid of a little dull, but it’s more difficult. It’s finally plumbing. This is a photo of the front right, but I will insert new piping from here. I could hardly see the tip of the pipe under the master back, and there was a pipe that was quite squeaky, so it was difficult to decide in what direction to put it in, so I had a hard time. After trial and error, it was settled. It seems that the pipe for the left front will never be attached as it is in terms of layout, so bend the part that enters the tire house, pass it through, and then return it to the original angle. After that, install two rear pipes and bolt them in two places with the original fixing brackets. […]