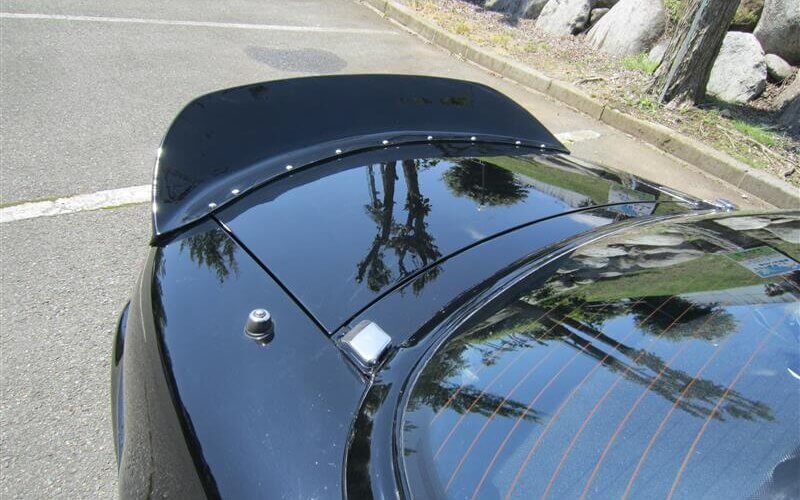
The ducktail is now polished and installed. The set screws will be changed to black painted ones at a later date.I am satisfied with the way the body line is connected with the body. External products tend to be three-part ones, but I didn’t want to do that, so I fitted them in this way. It looks like this from the rear.You may not recognize the type of car for a moment. I think it matches the front protrusion.I know everyone has their own taste, but I didn’t like the round shape of the stock NA. I didn’t like any of the aero parts sold in the market, so I made all of them by myself, and I ended up with a style that I like very much.I like this kind of sharp silhouette. Ducktail Spoiler for Mazda Miata MX-5 NA 1989-1997 Roadster Rear Trunk Duckbill https://ebay.us/xZQOoK
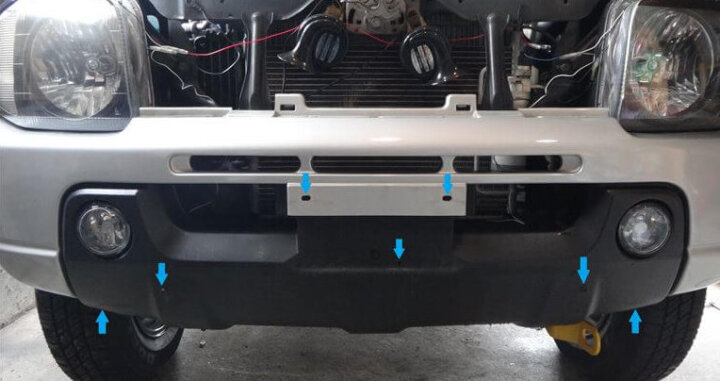
The red arrow in the photo is the clip position, and the blue arrow is the bolt position. First, open the hood and remove the front grill. There are only three black clips at the arrow on the photo, so pull it out and remove the grill. The photo is already after removing the grill. When you remove the grill, there are three black clips on the upper part of the bumper below it (the part indicated by the arrow below), so remove it. Remove the number and under garnish attached with the bolt or bolt nut at the position of the blue arrow. For the under garnish, if you do not remove it, you will not be able to see the bolt that holds the bumper at the bottom, so you will not be able to turn the bolt. I don’t think this work is necessary unless the car is equipped with an under garnish. The photo is after removing the number and under garnish. Remove the 3 bolts on the underside of the bumper and the 2 black clips on the outside. Remove the three black clips that secure the fender liner (black resin plate on the circumference […]
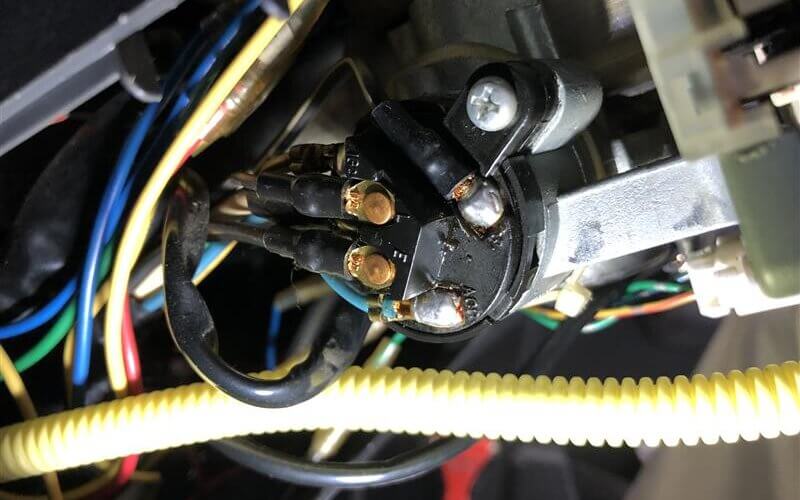
After starting the engine, the following phenomena have come to occur. (1) The power window switch makes a strange noise and does not move.(2) Rear defogger does not work.(3) The blower fan does not work. I checked the wiring and fuses, but the conclusion was that the key position did not return exactly from the start to the ON position. After starting the engine, I returned it a few millimeters and all the functions worked in the normal position. Replace the ignition switch. It is fastened with one screw. Remove the coupler near the steering shaft. Unlike the late model, it cannot be separated. Assembling with a key cylinder costs about $ 150. Disassembling is also troublesome. Cut the wiring that connects to the key cylinder. Replace from 270,000 km of type 1 to 90,000 km of type 2. Reconnect with a bullet terminal. I installed it in the reverse procedure and the problem was solved. For reference, the late model comes with a coupler so it can be easily replaced. Vehicles over 200,000 kilometers need to be replaced. This switch is also separated by a coupler, but for some reason we do not sell switch-only parts, and unnecessary harnesses […]
Recently, the power window of JB23 Jimny is not working well. It vibrates jerky at the start and stop. Motor life? I will disassemble it for the time being. As a preparation, tape the door handle. Remove the parts marked with a circle. When I remove the panel, I pull out the coupler of the switch, but I can’t pull it out even if I push it with my finger. Push it with a flat-blade screwdriver and it will come off quickly. The driver’s side was pushed with a finger and slipped out. After removing the panel, switch it on again and lower the glass. Remove the bolt indicated by the circle that holds the glass, and raise the glass to the top. Tape the glass and push the switch down to lower the frame. The yellow circle is the switch. Remove the blue circle coupler to the motor, but you can push it by hand. The X frame will not come out unless you remove the clip from the sheet metal after pulling it out. Remove the four red circle bolts on the right, and remove the two red circle bolts on the left while supporting with your hand. […]
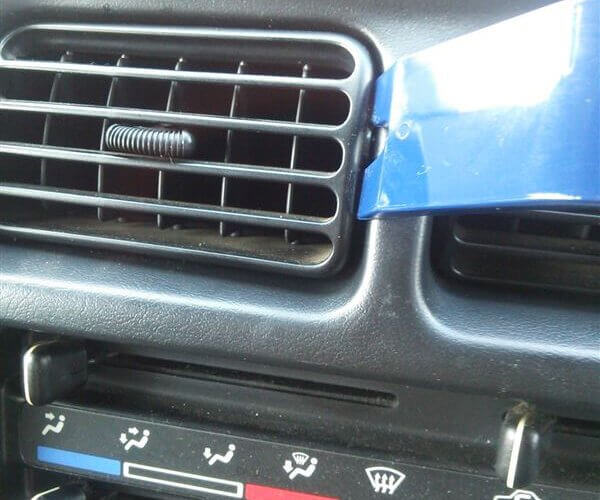
In the summer, JB23 Jimny’s air conditioner louver becomes loose and turns upward, but I adjusted it. Since the plastic is hardened, insert the interior peeler on the right side of each louver and carefully remove it. There is a small part on the left side of the louver, which seems to adjust the looseness. A tension is applied by putting an M2.6 washer in the hole where the small part was fitted. The washer fits snugly. Fit the notch of the small part on the front side. Carefully fit the louver from the left side and you’re done. It looks like it was completed without any discomfort.
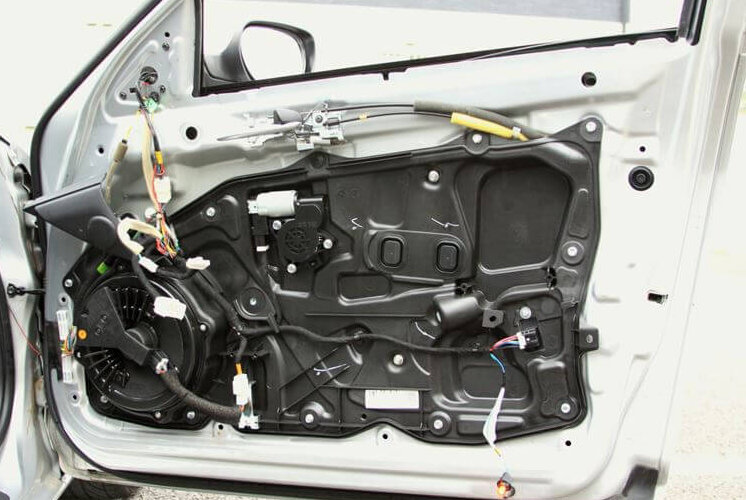
First, open the window before removing it. The image is after removing it. Next, remove the triangular part at the base of the door mirror. Since it is only fastened with the claws and clips, pull the arrow part toward you with your hand and remove it with a snap. Remove the screw on the door handle and remove the cover while standing the door handle. Since the panel of the power window is only fixed with a claw, remove the red arrow part by a interior remover or using a small flat-blade screwdriver, etc. (upper image). Remove the screws surrounded by orange and remove the two couplers with red circles (lower image). The larger coupler is very difficult to pull out. Remove the screw in the door pocket. All that remains is the clip, so lift it from the bottom of the interior with a small flat-blade screwdriver and remove it. On the way, carefully remove the courtesy lamp (upper image) and the power window panel lighting coupler (lower image). Finally, lift off the top of the interior, which is hooked on the window and fixed, and you’re done. On the passenger side, the procedure is the same, except […]
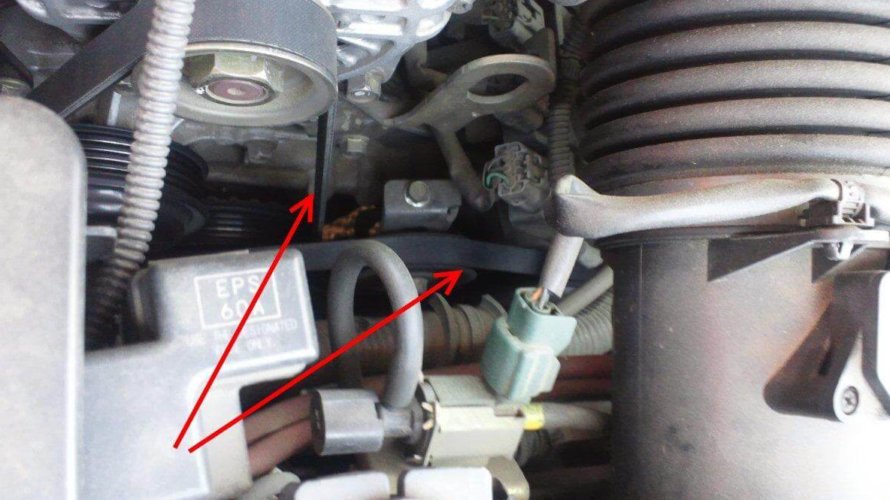
The belt on the right is the belt for the air conditioner. It’s that easy. Loosen the bolt. First loosen No. 1 and then loosen No. 2. It is 17 mm. A long box wrench straight is recommended as it will use loosen the deep part. It’s okay if you loosen it enough to turn it by hand. The air conditioner tension bolt is 10 mm. It’s really easy to have a long extension and a quick spinner. As you loosen this bolt, the belt will loosen. It is convenient to have a quick spinner because it loosens quite a bit. To install it, remove the belt, attach a new one, tighten No. 2, lock No. 1, start the engine, turn on the air conditioner, run in to some extent, and check the tension again. Since it is a V ribbed belt, it is a point to check if it is firmly in the groove of the pulley. Please note that it will be difficult to start the engine in a misaligned state. The tools used are the upper extension, 10mm box, middle long box wrench 17, 19/3/8 ratchet and quick spinner.
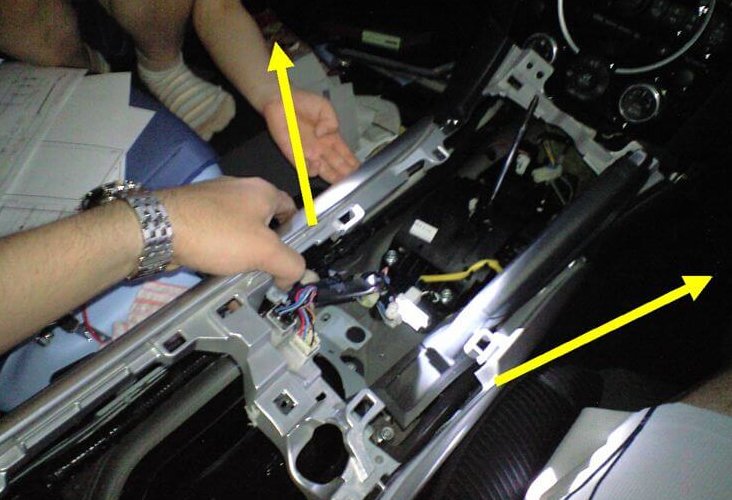
I think there are many people who want to remove the RX-8 center console. Want to add more heat insulating material to take measures against heat Want to pass the wiring through this Want to change the color of the light at the shift (AT) Want to put an LED in the drink holder Want to pick up the money that fell in the back of the ashtray Well, regardless of the reason, I will show you how to remove it. First, remove the lid between the back seats and remove the lower screw. Next, remove the screws inside the drink holder. The shift knob can be removed by turning it counterclockwise. After removing the shift knob, lift the lower panel. It takes a little force, but don’t be afraid to remove it slowly. When the panel comes off, one screw will appear. Remove this. Then, the back half can be completely removed. It is an integrated type. Next, remove the ashtray part. Then, two screws will come out again, so remove them. You can remove it by moving it back a little and lifting it up. It’s easy!That’s it.
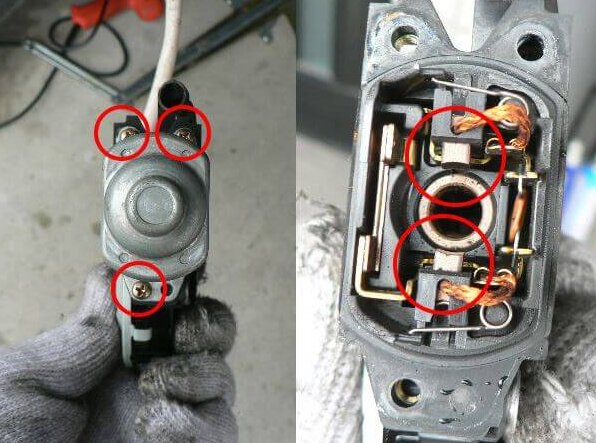
See the article below for how to remove the retractable headlight assembly. Remove the two screws and disassemble the switch. There is a black dirt on the contact. Especially, black dirt are attached to the central contact and the inner contact. Clean this with a waste cloth. It has become clean. With this, I connected 12V and confirmed the operation, but it stopped at a certain point on the up side. Further verification. Even if you look at the circuit diagram, it’s a simple circuit, so what’s wrong? There is no problem because the relay clicks. Probably due to poor contact. The operation of the retractable light is like this. A short circuit between the red circle in the middle and a blue circle on the inside is a half-turn up operation, and a short circuit between the red circle in the middle and the yellow circle on the outside is a down operation. How do you control it … The blue circle on the circumference of the inner terminal has no copper plate and is disconnected from the middle terminal. This is the position where the motor should stop working. At that time, the terminal in the middle and […]
The left side of the RX-7’s retractable headlights has stopped working. If you move it up and down manually, the motor will occasionally react. After removing the bezel of the light, remove the headlight cover while raising and lowering the light. Remove the two bolts indicated by the red circles in the image. Remove the two bolts on the back side indicated by the red circle. When you’re done, remove the battery. Remove the two bolts from the battery side. After that, put your hand through the gap of the light and remove the lower bolt. Now when you disconnect the retractable connector and the bulb connector, the light will come off. This is the retractable assembly. Don’t forget to remove this linkage to remove the motor. The link ball can be removed by levering it. Continue to repair of retractable headlight motor.