See the article below for how to remove the retractable headlight assembly. Remove the two screws and disassemble the switch. There is a black dirt on the contact. Especially, black dirt are attached to the central contact and the inner contact. Clean this with a waste cloth. It has become clean. With this, I connected 12V and confirmed the operation, but it stopped at a certain point on the up side. Further verification. Even if you look at the circuit diagram, it’s a simple circuit, so what’s wrong? There is no problem because the relay clicks. Probably due to poor contact. The operation of the retractable light is like this. A short circuit between the red circle in the middle and a blue circle on the inside is a half-turn up operation, and a short circuit between the red circle in the middle and the yellow circle on the outside is a down operation. How do you control it … The blue circle on the circumference of the inner terminal has no copper plate and is disconnected from the middle terminal. This is the position where the motor should stop working. At that time, the terminal in the middle and […]
The left side of the RX-7’s retractable headlights has stopped working. If you move it up and down manually, the motor will occasionally react. After removing the bezel of the light, remove the headlight cover while raising and lowering the light. Remove the two bolts indicated by the red circles in the image. Remove the two bolts on the back side indicated by the red circle. When you’re done, remove the battery. Remove the two bolts from the battery side. After that, put your hand through the gap of the light and remove the lower bolt. Now when you disconnect the retractable connector and the bulb connector, the light will come off. This is the retractable assembly. Don’t forget to remove this linkage to remove the motor. The link ball can be removed by levering it. Continue to repair of retractable headlight motor.
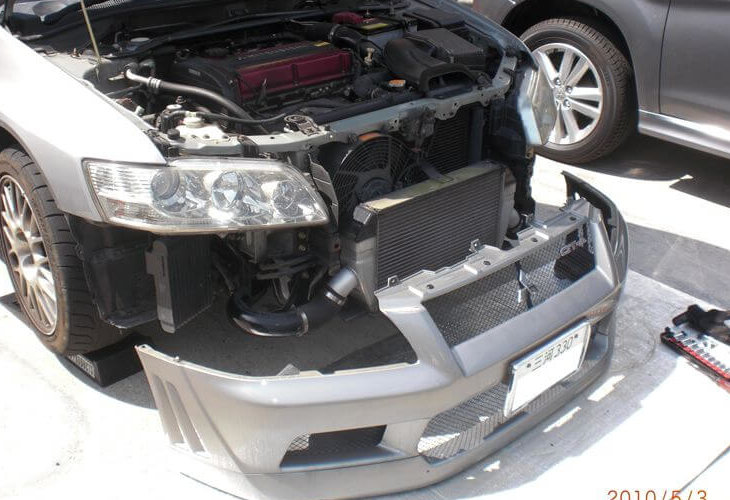
This is an explanation of how to remove the front bumper of Mitsubishi Lancer Evolution VII. It’s pretty easy if you can separate the undercover. The procedure is from the state where the clip of the undercover is removed. The reason why the license plate is removed in the photo is because the photo processing is troublesome. You can remove it with the license plate attached. Remove the 10mm bolt in the corner of the intercooler duct. There are two symmetrically opposite sides, so a total of two. Remove the clip and 10mm bolt on the top of the bumper. This is also symmetrical with 2 clips and 2 bolts. Remove the clip with a small flat-blade screwdriver. Remove one 10mm bolt and two clips at the bottom inside the wheel hood. The same applies to the inside of the wheel hood on the opposite side. Before removing it, if you turn the steering wheel and let the tires escape before removing it, you can secure space and work faster. Since there is a part that is inserted in the fender, pull it down a little and separate it. After that, pull it straight out to complete the removal of […]
When it became cold and I started the engine, the roaring noise became terrible for a while, and I was riding in a deception by changing the power steering oil, but since the power steering tank was full of bubbles, I decided to replace the pump for the time being. I think the cause of cavitation is that it has sucked in air, but I don’t know where it came from, and apparently there is no oil leakage. In any case, Subaru’s hydraulic pumps of this age seem to have troubles over the years, including the Legacy, so I’m thinking of replacing them with rebuilt pumps to see the improvement in symptoms. First of all, I got a rebuilt pump, but my GDA power steering pump is a model called 34430FE041, which seems to be out of stock in the rebuilt market. I had a little trouble buying it online (34430FE041 seems to be common with 040, 070 and 071). At the same time, I ordered two hoses connected to the power steering tank that could be easily replaced and a metal gasket on the high pressure side that connects to the pump and prepared them. Return hose 34611FE050Suction hose […]
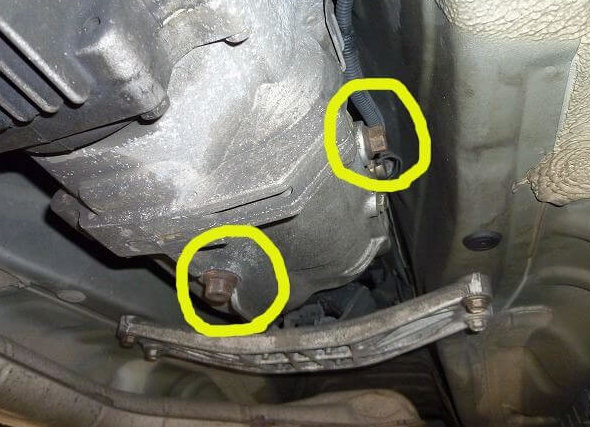
Preparing for work Here’s a summary of what you need to change Supra’s mission oil. Mission oil 2L 17mm socket or combination wrench (It requires a lot of torque, so it should be as long as possible) Spinner handle, ratchet wrench, etc Stainless steel pipe with an inner diameter of around 10 mm (Use with a combination wrench) Liquid gasket Oil suction equipment such as suction gun Creeper (Convenient if you have) Waste oil processing box Paper waste Disposable vinyl gloves Work gloves Brake cleaner Hydraulic jack and rigid rack Lowdown slope How to change the transmission oil The yellow circle on the right side of the photo is the oil inlet, and the yellow circle on the bottom is the oil drain. Since the standard amount of mission oil for Supra is 1.8L, you can work by preparing 2L of mission oil. At least the front must be jacked up when changing. After jacking up, be sure to use a rigid rack as a safety measure. (The 5MT W58 mission uses 2.6L of oil, and the 6MT V160 or V161 mission uses 1.8L of oil.) Now, I will explain the flow of mission oil change. First, run your Supra […]