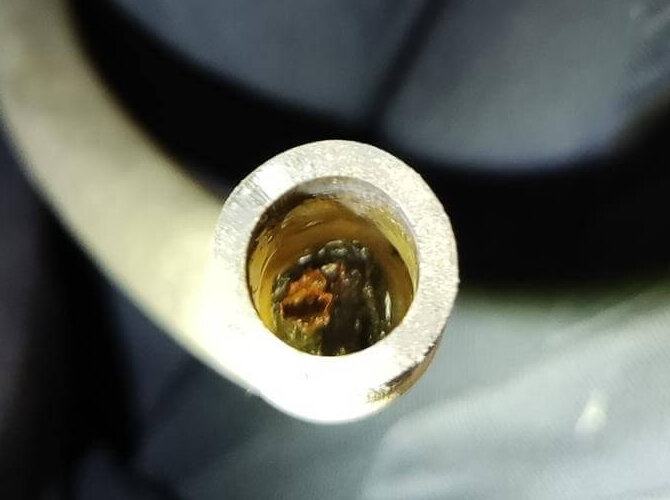
Figaro has a hose to drain the water that has flowed into the gap between the trunk hangar and the hood. Most of the cases of this hose have not been replaced for 30 years. I think you should replace it immediately. If the drain water does not come out easily, it is highly possible that the hose is clogged. If it is not replaced, it has deteriorated like the state of the attached image. This hose is on the left and right, looking into the trunk. Looking at the removed hose, it was so clogged. Drain water does not flow. That’s why I will replace it. Prepare a hose with an inner diameter of 10 mm and a hose of about 2 m 20 cm. It is a silicon hose. The hose is fairly stiff, but pull it out while twisting it. There are two hoses, so pull out both. After pulling out both, pull up and pull out the lower side as well. After pulling it out, cut the purchased hose according to the length of the existing hose and replace it. When you have finished replacing it, put it back. It has a hose glamp, but it […]
There is nothing wrong with the tail lens, but in consideration of the model year, the gasket was replaced before the lens was flooded. I forgot to take a picture, but the part numbers of the gaskets are as follows. Please note that the product numbers are different on the left and right.Right: 33502-S2A-A11Left: 33552-S2A-A11 Part of the interior of the trunk will be removed. It is not necessary to remove all of them, just remove them by turning over only the area around the tail lens. The lens is fixed with 4 nuts. Work is easier with a 10mm deep socket. Be careful not to forget to remove the couplers. The nut at the back has a clip to fix the wiring, so remove it by interior remover. It is very dirty when the lens body is removed. While replacing the gasket, also clean it. The car body side is also quite dirty. Mud stains can cause rust, so it’s best to keep them as clean as possible. Install a new gasket. The side with double-sided tape is the lens side. It will recover in the reverse order. Actually, I didn’t know the tightening torque of this nut, so […]
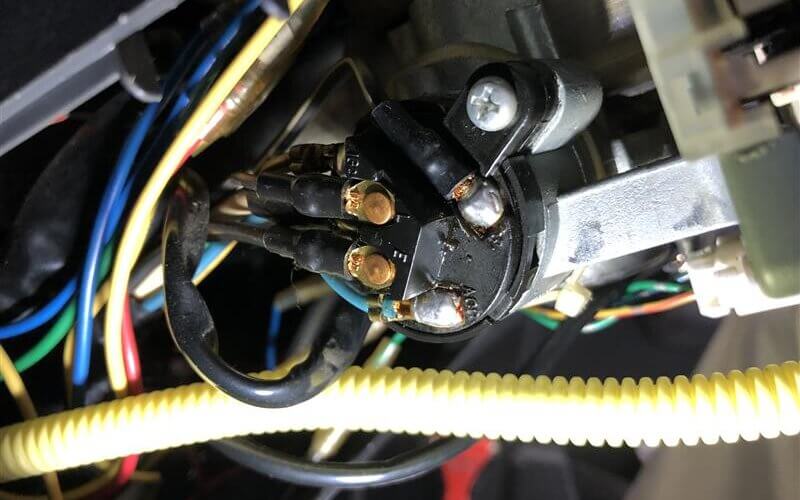
After starting the engine, the following phenomena have come to occur. (1) The power window switch makes a strange noise and does not move.(2) Rear defogger does not work.(3) The blower fan does not work. I checked the wiring and fuses, but the conclusion was that the key position did not return exactly from the start to the ON position. After starting the engine, I returned it a few millimeters and all the functions worked in the normal position. Replace the ignition switch. It is fastened with one screw. Remove the coupler near the steering shaft. Unlike the late model, it cannot be separated. Assembling with a key cylinder costs about $ 150. Disassembling is also troublesome. Cut the wiring that connects to the key cylinder. Replace from 270,000 km of type 1 to 90,000 km of type 2. Reconnect with a bullet terminal. I installed it in the reverse procedure and the problem was solved. For reference, the late model comes with a coupler so it can be easily replaced. Vehicles over 200,000 kilometers need to be replaced. This switch is also separated by a coupler, but for some reason we do not sell switch-only parts, and unnecessary harnesses […]
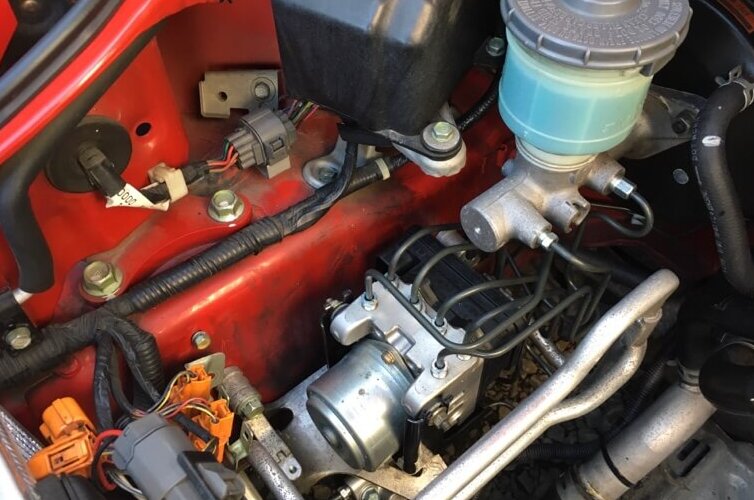
This article is a continuation of the article on replacing ABS Part 1 (Unit Edition). For this ABS replacement, the modulators of other models were diverted. Harness kits are sold by various shops if it is a modulator for the latter model of NSX, and I think that there is almost no trouble with coupler on, but of course this can not be used as it is because the wiring is different. Harness kits are also quite expensive, and considering the time and effort of using them to replace wiring, I decided to make all of them. Therefore, one point is that when you buy a second-hand modulator of another model, you should buy not only the main body but also the one with the wiring cut in the middle as shown in this image. If it is only the main body, it will be necessary to obtain a coupler separately, and the hurdle will rise at once. If it’s just the main body, it’s rolling at a price like free. Access the ALB control unit by removing the glove box, air conditioning duct, and floor panel on the passenger side. I will remove this because it is no longer […]
This article is a continuation of the article on removing ALB (Anti-Lock Brake). We have prepared in advance the genuine parts required for ABS replacement. Other than those that can be diverted from ALB, mainly brake piping, modulator brackets, proportioning valves, bolts, etc. First of all, I assembled around the modulator using the bracket etc. removed from ALB. I polished the things to be reused and got rid of a little dull, but it’s more difficult. It’s finally plumbing. This is a photo of the front right, but I will insert new piping from here. I could hardly see the tip of the pipe under the master back, and there was a pipe that was quite squeaky, so it was difficult to decide in what direction to put it in, so I had a hard time. After trial and error, it was settled. It seems that the pipe for the left front will never be attached as it is in terms of layout, so bend the part that enters the tire house, pass it through, and then return it to the original angle. After that, install two rear pipes and bolt them in two places with the original fixing brackets. […]
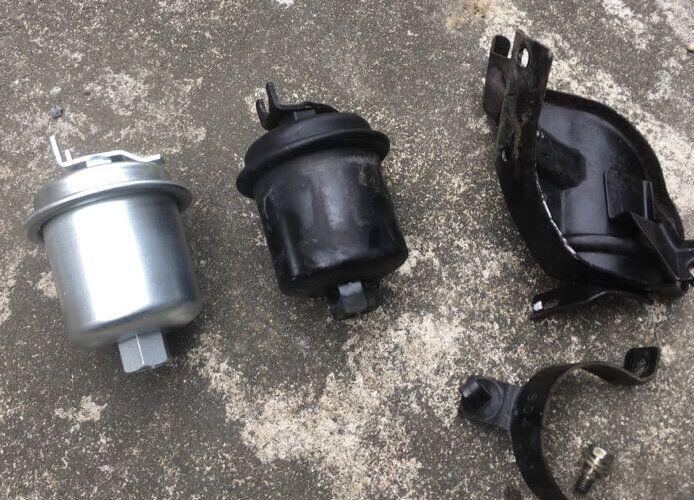
Replace the fuel filter that you think has not been replaced for a long time. The current mileage is 160,000 km. Before starting work, I removed the fuse just in case to release the fuel pressure. It is quicker to remove the intake pipe than to struggle in a small space. Place a waste cloth under the filter in case of gasoline overflow. The fuel filter used is Monotaro. Two copper washers are also included. First, loosen the flare nut on the lower side. A flare nut wrench of 14mm is required as it is fairly tight. Gasoline will leak, so tighten it lightly. After loosening the upper union bolt, loosen and remove it with 2 bolts and 1 nut on the bracket, 10 mm. It is easier to have a universal joint and a deep socket. The figure which removed the whole bracket. It smells so bad because it leaks a lot of gasoline. The plastic bracket to which the mysterious hose is connected has crumbled. Old and new fuel filters. I like black like genuine. Insert a new copper washer above and below the union bolt and tighten it tightly. Start the engine, check that there are no […]
Considering the model year, I replaced the genuine radiator, which can burst at any time, with an external product. By the way, all the coolant is replaced. First, open the drain cock at the bottom of the radiator and drain the coolant. Jack up left and right, and hang the rigid rack only on the rear side so that the front side goes down. While removing the coolant, remove the bracket on the top of the radiator and the relay-related connector of the electric fan. When the coolant is almost drained, remove the upper hose and lower hose, and pull out the radiator directly above. Completed removal of genuine radiator. The radiator to be installed this time is TYPE-F made by KOYO. The capacity is increased to 48 mm compared to the genuine thickness of 32 mm. Dry weight is about 4.25 kg. It ’s all aluminum, so it ’s very light. The weight of the genuine radiator is about 4.02kg, so it is a little heavier. I’m moving the electric fan to a new radiator, but the fan shroud and the hose attachment part interfere a little, so I cut out that amount. After assembling the electric fan, install […]
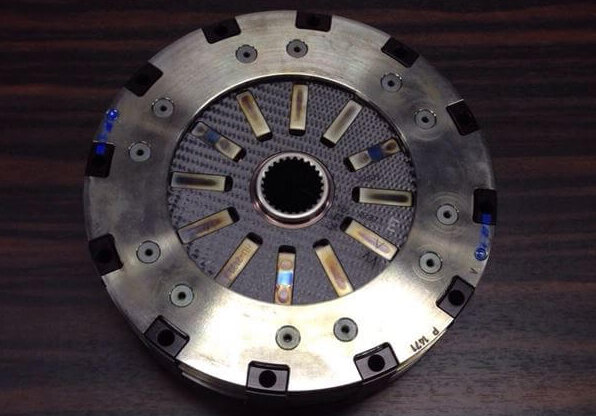
Carrera GT clutch looks like this. The carbon triple makes it look like a racing car clutch. This vehicle will be replaced at about 15,000km. You can see the carbon plate from above. The clutch kit alone can easily exceed $ 10,000. This is a release module. The structure is such that the cylinder moves hydraulically to disengage the clutch. This also costs about $ 5,000. The rear section is already disjointed. The maintainability is not good for flattery, but it may be the fate of such a special model. Also remove the engine. The V10 engine is truly for racing and is extremely compact. You may be able to buy a 1DK apartment in a prime location with just this.
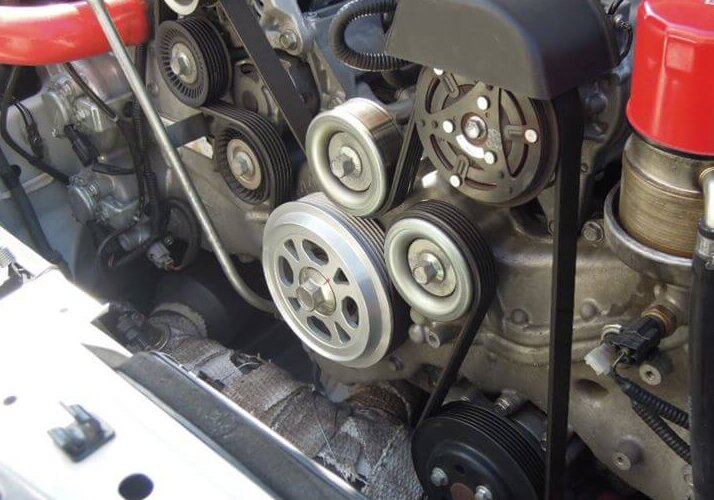
It was a part that I hesitated so far, but I attached it because it was available at a low price. It is a crank pulley made by ZERO / SPORT. Remove the battery terminal and remove the area around the air cleaner to secure space. Originally, a special tool is required, but it can be done without it. You can lock the crank by putting the gear in 6th gear (5th gear) and applying the side brake. (MT car) As an aside, if it’s an FF car, it’s okay if someone steps on the brakes. Extend the ratchet handle with a pipe (700mm) and apply force to loosen the pulley bolts. Since the drive system is twisted, it is difficult to apply torque for a moment, but it loosened after several attempts. If you want to use a breaker bar, you need 600mm or more. If you can do it so far, it seems that the work is almost finished. Hook a tool on the tensioner bolt and apply force to turn it clockwise to loosen the belt, so remove it as it is. Remove the genuine pulley. Replace the O-ring with a new one. Bolt the lightweight pulley. […]
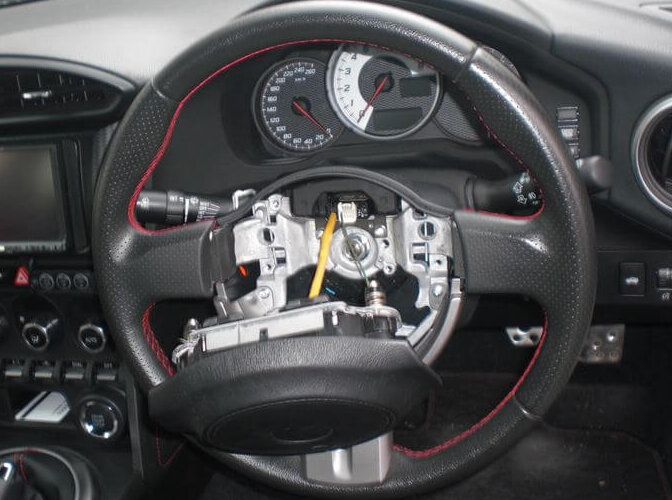
Before disconnecting the steering wheel, first disconnect the negative terminal of the battery. Next, if you look at the red circle in the photo from the side, there is a hole. Insert a flat-blade screwdriver there to unlock the airbag. (3 places) Yes, the airbag has come off. It’s easy. Use a flat-blade screwdriver to pry the airbag terminal slightly to remove it. Now, let’s remove the steering wheel. Loosen the center bolt and pull it while pushing and pulling it back and forth and left and right with the bolt slightly applied. The bolt is pretty stiff. The steering has come off. Install the airbag canceller and horn terminals. Attach the steering boss and insert the wiring inside. Make sure that the triangle mark on the boss is on top. Connect the wiring of the horn and attach the steering to complete. After that, connect the battery and check if the navigation starts and if the airbag warning light goes out.