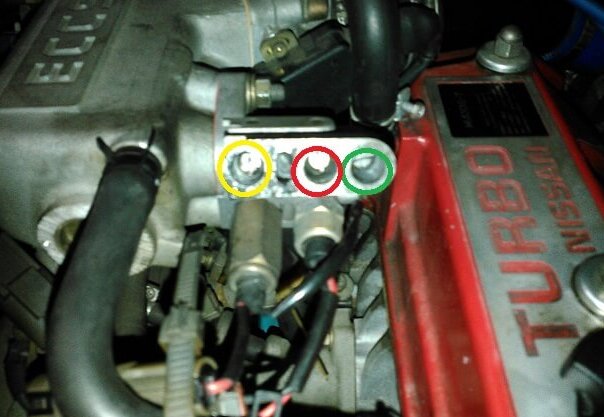
I have overhauled the IAA unit several times, but when the electrical load increases, the idle up becomes unsuccessful. I got a valve at an online auction and came today, so I replaced it immediately. By the way, the IAA unit is an abbreviation for idle auto adjust unit and is an automatic idling adjustment device. Today’s cars do various things with one AAC valve, but Figaro has a configuration that makes you feel the transition period of the era of shifting from carburetors with three adjustment devices to injection. Immediately after starting, the air regulator is also involved, so it is a problem that there are many parts and many parts are fragile. For the time being, incorporate and adjust. The green circle is the basic idling adjustment screw. The red is the air flow rate adjustment screw of the idle-up solenoid valve corresponding to the electric load changed this time. Yellow is the air flow rate adjustment screw for the FICD (First Idle Control Device) solenoid valve that supports air conditioner loads. By the way, the method is to close the red and yellow circle screws with the lights and other electrical equipment off and the air conditioner […]
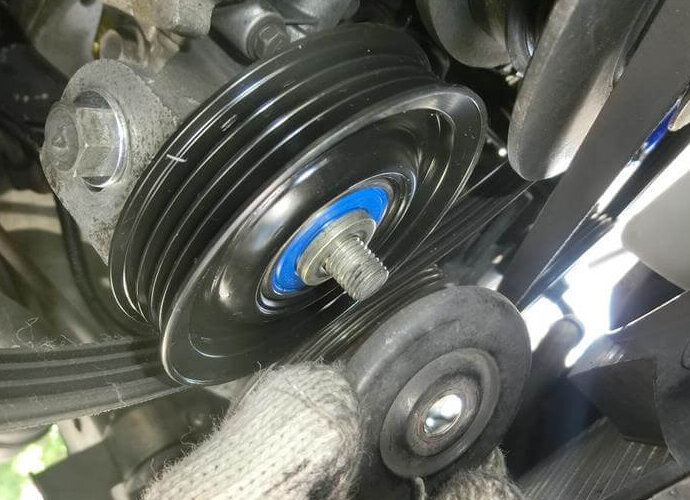
I knew that there was some play in the idler pulley before, so I changed the alternator and then replaced it as well. Idler pulley genuine product. Part number: 11927-VC800 It’s easy to replace. Loosen the nut in the center to free it, so use the adjust bolt below to raise the pulley and remove the belt. After removing the belt, lower the pulley to remove the nut, remove the washer inside like a lid, and remove the pulley. The bearing of the old idler pulley that I removed was still loose. Installation is completed easily in the reverse procedure. Since the bearing is quite loose with respect to the shaft, the backlash is not completely eliminated. I think that it is better to replace the shaft if it seems that the backlash is too bad even if it is replaced. Since this belt only drives the air conditioner compressor, adjustment is completed with moderate tension so as not to overload. It was easy to finish, so I tried “Isn’t it cheaper to replace only the bearins?” From the result, it seems that it is impossible to use hand-held tools. The board was thin, and it was probably baked in, […]
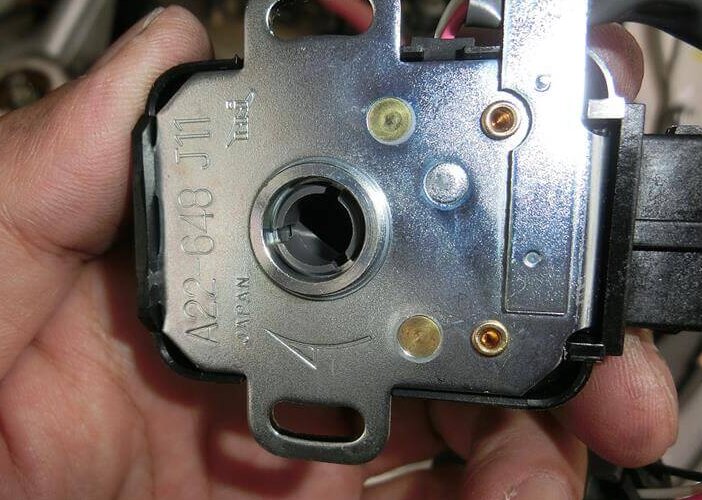
Recently, intermittent fuel injection during engine braking has recurred. I thought it might be because I had fixed it when I turned off O2 feedback before, but it seems different. There is also a flutter when the accelerator is suddenly stepped on, and it seems that the deterioration of the sensor is the cause when examining various things. Part number: 22620-05U01It’s a reasonable price of $ 50. Is it because it is also used in other models? This sensor has the following two functions, and the coupler on the main body side is the throttle valve switch. ・ Throttle sensor (voltage change due to throttle amount)・ Throttle valve switch (ON / OFF switch for idle judgment) First of all, the hose is an obstacle to turning the bolt, so pull it out. Remove the bolt by turning it with a 7 mm spanner or a + screwdriver. Remove the coupler on the main unit and the coupler with the cable. The coupler on the main unit has a pin to prevent it from coming off, so remove it. You can see the shaft by removing the sensor. There is a notch so you can see it when installing. There is […]
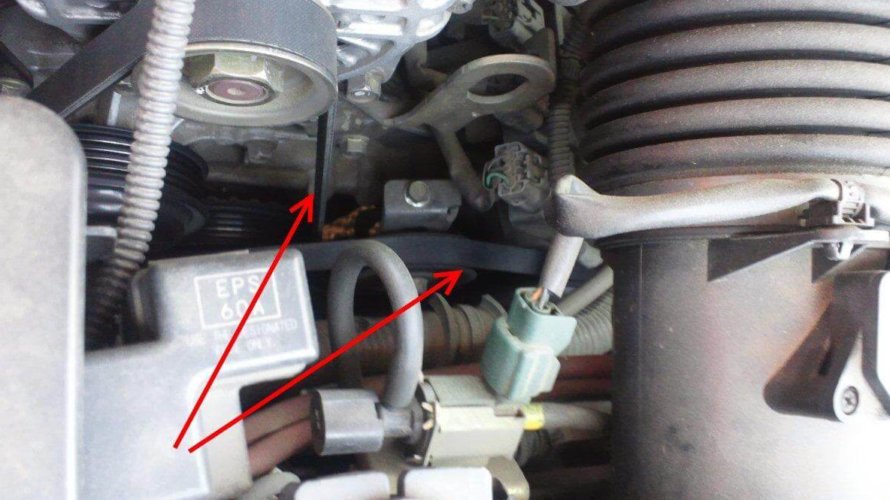
The belt on the right is the belt for the air conditioner. It’s that easy. Loosen the bolt. First loosen No. 1 and then loosen No. 2. It is 17 mm. A long box wrench straight is recommended as it will use loosen the deep part. It’s okay if you loosen it enough to turn it by hand. The air conditioner tension bolt is 10 mm. It’s really easy to have a long extension and a quick spinner. As you loosen this bolt, the belt will loosen. It is convenient to have a quick spinner because it loosens quite a bit. To install it, remove the belt, attach a new one, tighten No. 2, lock No. 1, start the engine, turn on the air conditioner, run in to some extent, and check the tension again. Since it is a V ribbed belt, it is a point to check if it is firmly in the groove of the pulley. Please note that it will be difficult to start the engine in a misaligned state. The tools used are the upper extension, 10mm box, middle long box wrench 17, 19/3/8 ratchet and quick spinner.
Nissan Figaro hasn’t been able to raise the water temperature for a while. I thought that the thermostat was stuck open and replaced it. First, prepare the tools. Prepare a 10mm box wrench and ratchet wrench, a flat-blade screwdriver and water pump pliers. First, remove the turbo intake pipe. Remove the drain bolt of the radiator and remove the coolant. You can access the thermostat by removing the cooling water pipe to the thermostat. For the time being, the intake port of the turbo is packed with waste cloth to prevent foreign matter from entering. Thermostat appears if you remove three 10mm bolts. The thermostat is oriented and the TOP stamp is on top. Just in case, apply liquid packing and install it, and then assemble in the reverse order. Put new coolant in the radiator, turn the engine for a while, check that the thermostat opens, check the amount of coolant, and finish! It took about 40 minutes.
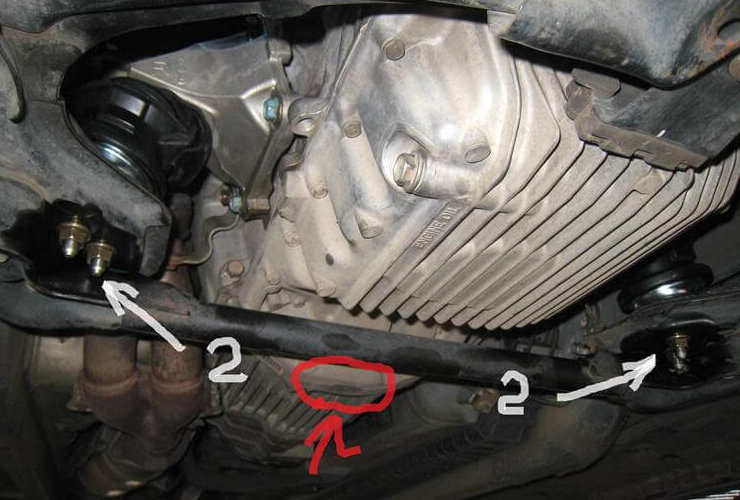
Replacing the engine mount is a little difficult. Anyone with motivation and patience can do it. The tools are a box wrench and a socket wrench. The smaller the socket, the better. Rigid racks and garage jacks are a must. The rest is a genuine scissors jack. Perform normal jack up. Raise it enough for people to enter. Next, remove the two nuts on the underside of the mount. There are a total of 4 on both the left and right. Then use a scissors jack to raise the engine at the joint between the engine and the mission. It is around the red circle. Raise the engine until the screw heads in this photo come out a little. If you have an engine damper, don’t forget to remove it before raising the engine! In addition, it may be better to remove the intake of the aftermarket product for safety. Remove the four bolts on the driver’s side and engine side shown in this photo. I think that you can take a lot of space by lowering the coupler of the air conditioner cord from the air conditioner compressor and removing it, and by removing the ground wire from the […]
When it became cold and I started the engine, the roaring noise became terrible for a while, and I was riding in a deception by changing the power steering oil, but since the power steering tank was full of bubbles, I decided to replace the pump for the time being. I think the cause of cavitation is that it has sucked in air, but I don’t know where it came from, and apparently there is no oil leakage. In any case, Subaru’s hydraulic pumps of this age seem to have troubles over the years, including the Legacy, so I’m thinking of replacing them with rebuilt pumps to see the improvement in symptoms. First of all, I got a rebuilt pump, but my GDA power steering pump is a model called 34430FE041, which seems to be out of stock in the rebuilt market. I had a little trouble buying it online (34430FE041 seems to be common with 040, 070 and 071). At the same time, I ordered two hoses connected to the power steering tank that could be easily replaced and a metal gasket on the high pressure side that connects to the pump and prepared them. Return hose 34611FE050Suction hose […]
First, jack up and fix it on the stand. At the same time, it is easier to work if you remove the front left wheel. It is even better to remove the front bumper if possible. If you have a lift, you don’t have to this. Remove the Supra starter motor from below. All you have to do is remove the two bolts that secure the starter motor. However, it is very narrow and difficult to work with. This may be true not only for 2JZ but also for 1JZ. By the way, the bolt diameter is 14mm. Remove it by making full use of the 14 mm socket and the long extension and universal joint. If you loosen it with a torque wrench first, you can remove it easily. Be careful not to drop the bolts as they are long! It is safer to wear protective equipment. If it comes off so far, remove it while being careful not to drop it. Comparison of a detached starter motor and a new starter motor. Above is new one. The product number above is …T Product number 28100-46200D Product number 228000-5970 Below is …T Product number 28100-46140D Product number 228000-1960 Even […]
Let’s replace consumables as much as possible for preventive maintenance. This is a new fuel filter. First, release the fuel pressure. Let’s remove the fuel cap. You should hear a “psss” sound when you remove it. If you don’t hear it, may have leaked pressure between the fill port and the tank. Next, release the fuel pressure from the fuel pump to the injector. The most common method is as follows.1. Pull out the fuel pump fuse.2. Remove the fuel pump relay.Then the pump will not turn, so if you start the engine in that state the fuel will not go to the injector and it will stall in a few seconds and the fuel pressure will release. But Figaro doesn’t work this way. About step 1,there is a fuse, but it also serves as a power supply for the engine ECU, so it is no good. As you can see, step 2 is troublesome because you have to remove the air cleaner, and there is a possibility that the outside coupler will crack due to aging. So there is the easiest way. Unplug the fuel pump coupler. The place is the coupler shown in the image that appears after […]
Replace 300ZX fuel filter to improve idling malfunction. Since it’s work on the fuel line, of course fire is strictly prohibited. This is the genuine fuel filter we were preparing. I also wanted to replace the hoses, but I couldn’t make it in time. First, work to reduce fuel pressure. Check the position of “FUEL PUMP” in the fuse box. Start the engine and remove the “FUEL PUMP” fuse that you just checked. It should stall after a while, if for some reason it didn’t stall, you must stop the engine. Remove the fuel cap. Then crank it several times. OK if the engine does not start. Remove the negative of the battery. Prepare a towel and aluminum vat and remove the filter. Fortunately, there was no struggle such as the hose not being pulled out as heard in the rumor, and it was not tough. The fuel was a little spilled, but it was okay. By the way, the fuel that came out of the filter. I could not disassemble the filter because there were no tools, but it may have been quite dirty. Installation complete. The material on the out side was different from the one that was […]